Remember when you were a kid and you played “lava”?
No?
Bummer.
It was a fun game. You had to get from one part of the living room to the other without touching the floor.
Why?
Because the floor was really made of molten lava, right? So you had to climb all over the furniture to get across the room safely.
Ironically, if you made it safely without falling into the lava, you then had to face the true danger:
Your mom… who was really pissed because you just climbed all over her nice furniture.
Tell me you played this game as a child.
(or maybe as an adult, which is a little weird)
It was a part of any normal childhood in many cultures.
Anyways, getting from one chord to another can be a similar kind of game.
Except in this analogy, the fretboard isn’t made of lava. And you’re not really climbing over strings, per se.
I think a better analogy would be a ropes course… where you swing from rope to rope.
Yeah, that’s it. Let’s go with that.
So all this to say that when transitioning from one chord to another, if you have the opportunity to keep a finger down on the same string & the same fret, you should take it. This is a very effective strategy for smoothing out chord transitions.
Check this out…
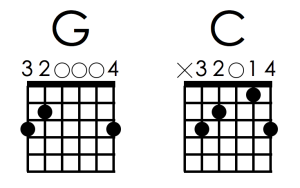
The point here is to go from the G chord to the C chord and keep the 4th finger planted on the 1st string. The 4th finger is acting as an anchor.
(geez, that took a while to get to the title of this whole thing!)
It’s also referred to as a common finger. What’s a common finger, you ask? In the 99 Decisions Course, I discuss the concept of ’common fingers”, which, simply put, is a finger that is used to play the same note at the same fret on the same string- common to two or more chords in a progression.
(not so sure that was “simply put”)
Anyways, using common fingers as anchors helps you transition smoothly from chord to chord. I just thought the whole “anchors” thing gave it a little more pizzazz… at least, for this article anyways. I originally was going to use, “Anchors Away!”, and then I fortunately Googled it and saw that it’s really, “Anchor Aweigh!”… which means to pull up your anchor to leave, so that wasn’t going to work as a play on words and then… oh, never mind.
Sometimes, you have to look for these anchors in your chord progressions. And if you make a game out of it, it will engage your mind at a deeper level & this is good training for you as you work towards your goal of making progress on the path of becoming a better guitar player.
So when you are working with chord progressions, you should do this kind of thing wherever you can. The key phrase is “wherever you can.” Because sometimes there is no common finger between the two chords. But, don’t overlook changing the fingering of the chords to create them.
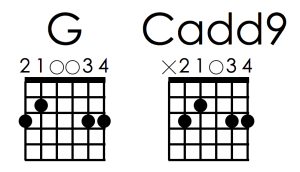
Check out these examples & remember to remember to pay close attention to the fingering!
(you don’t want to fall into the lava, I mean, let go of the rope!)
Here’s a longer progression…
An anchor doesn’t have to be the 4th finger…
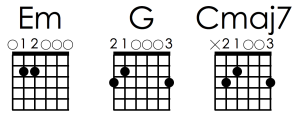
Here the 1st finger is the anchor between Em & G, and the 3rd finger is the anchor between the G & the Cmaj7.
Hey… isn’t this article is called “Anchors Away”?…as in plural… as in more than one anchor at a time is allowed…
Have you figured out the main premise here yet?…
Why pick something up that you’re going to put right back down again in the exact same place.
(it’s just that saying it that way isn’t academic enough for y’all)
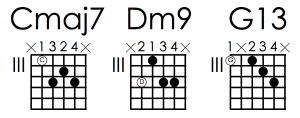
Okay, who let the jazz people in here?…
Well, since they’re here, we might as well let them add one more chord…
The concept works in all genres, of course. This is a good blues chord lick…
(and the root is on the 1st string with each chord)
The deal with this next one is that you want to keep the 1st finger barre anchored as well as the 4th…
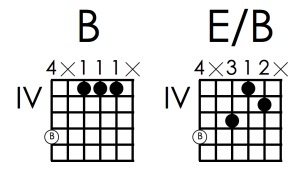
What’s that going on with that chord with the two letters, you ask? Well, that’s a slash chord, my friend.
Someone should do a blog post about those someday.
Oh, so you want some extra credit?
And some more slash chords?
Well, alrighty then…
And for those of you that are interested… that B on the bottom of each chord is referred to in music theory as a pedal tone, for those of you that like to know things.
I purposefully left out any indication as to how long to play each chord. Or any rhythm whatsoever.
This is so you can just focus on the chord transitions themselves.
Play through them slowly a few (hundred) times.
Once your fingers get the idea of where to go, then you can have fun experimenting with how many beats each chord gets.
Be creative… write some songs with these chords.
(then record the songs, release them as an album, and go on a world tour…. super easy!)
Doing a bunch of examples like this helps the brain & the fingers latch on to the concept. Now you know to be on the lookout for anchors in ALL your chord progressions. Remember, they’re not always there, but maybe if you modify a chord’s fingering, you just might be able to create a common finger(s) and smooth out the transition.
And, just so you know, this isn’t all about ergonomics. (meaning, your narcissistic fingers)
It’s also about sound. By having common fingers, this keeps the note, or notes, ringing while you move the other fingers that have to be moved.
And that just sounds better.
Oh, I could go on & on with these sorts of things regarding chord transitions. But that would take the fun out of it for you.
You should go on & on with all this.
Anytime you are playing two or more chords, look & see if you can find a common finger and make it the anchor.






Leave A Response